The Pioneer quick start guide is intended to help you get started using the vision system hardware and software bundled with the Pioneer robot. This outlines the hardware and software needed to get you started.
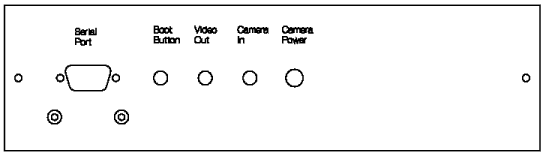
The following is a diagram of the vision interface panel. This panel allows you to connect to the vision system inside the Pioneer robot. If you thought that your robot has a vision system, but it is not equipped with such a panel, stop now and contact ActivMedia. The rest of this manual assumes that your system is equipped with such a panel.
These instructions assume that you have a Pioneer robot with a vision system, camera, and vision interface panel already properly installed and hooked up. If this is not the case, see section Pioneer Vision System Hardware Installation, first, then come back to this section when you are done.
The camera has two connectors: an RCA video plug, and a power plug. Connect the power plug to the Camera Power connector on the vision interface panel (see section Pioneer Vision Interface Panel Diagram). Connect the RCA video plug to the Camera In connector on the vision interface panel.
If you are using a radio modem, the robot end of the modem should be hooked to the vision system already. Follow the instructions in the Pioneer manual for how to connect the host end of the radio modem to your computer.
If you are not using a radio modem, you should connect a serial cable from your computer to the 9-pin serial connector on the vision interface panel. This is a standard IBM PC compatible serial connector.
DO NOT use the 9-pin serial connector on the top of the Pioneer. Connecting to this port would cause contention between the vision system's serial port and the serial port on your host computer.
Once you have located a suitable monitor and RCA video cable, connect the monitor to the Video Out jack on the vision interface panel (see section Pioneer Vision Interface Panel Diagram).
Towards the back of the robot from the main power switch are two other switches. Of these two, the switch closer to the center of the robot is the one which controls the vision system power. Be sure that this switch is turned on (the switch is pushed toward the back of the robot) before you try to use the vision system.
It should be the case that if you switch this switch off, then back on, you will hear some beeps and see a change in the video output monitor. If you plan to always use the vision system with the Pioneer, you can go ahead and leave this switch always in the ON position, and use only the main power switch to turn the robot on and off.
In the normal course of events, you will probably be using the Saphira host program to interact with the robot. In this case, the interaction between the host computer and the vision system will be transparent. However, there are reasons that you may need to communicate with the vision board using ARC.
WARNING: Be sure that ARC and Saphira are not both trying to talk to the robot at the same time. This will not work! Exit one before starting the other.
ARC is a serial interaction program which allows you to use a host computer to communicate with the vision system. If you have purchased the full ARC programming environment, you can write software that executes on the vision system processor itself. Even if you have not purchased the full ARC development system, purchase of a vision system entitles you to a Mini-ARC license.
Mini-ARC allows you to interact with the vision system for configuration and allows you to download new software releases, but does not include the libraries or the full compilation and interactive debugging environment. Mini-ARC is sufficient to do everything described in this section. See section Mini-ARC Installation Guide, for installation instructions. In the rest of this manual, ARC is used as the generic term to refer to the serial interaction program in either a full ARC Development System installation, or a Mini-ARC installation.
Before starting ARC, you'll need to know the name of the serial port you intend to use. If you do not know which port to use, see section Serial Port Names.
When using ARC to communicate with the Pioneer vision system, you should
invoke it with either the -pioneer or the -saphira flag, as
well as the -port portname flag to specify which serial port
to use (see section Serial Port Names). For example, arc -port /dev/ttya
-pioneer.
Either flag will set the baud rate to 9600 baud and allow you to download
new programs. The difference is that the -pioneer will cause the
system to exit Saphira mode, whereas the -saphira flag will not.
When ARC is invoked with the -pioneer flag, you will be prompted to
start the system, if not already running, and press RETURN to exit Saphira
mode. When you press RETURN, ARC will send a packet to the system to make
it exit Saphira mode and enter TPUVIS Prompt mode (see section TPUVIS Prompt Mode).
When ARC is invoked with the -saphira flag, it will bring up a
window for Saphira mode interaction. While the board is in Saphira mode,
this window will have a with a saphira> prompt. You can type
commands in this window to test out various features of the Saphira mode
interaction of the vision system. Type help in this window for a
list of possible commands.
Also, when ARC is invoked with the -saphira flag, it will prompt you
whether you want to exit Saphira mode when you issue a download or baud
rate change command. Generally, you should answer yes to these questions.
This is a small walkthrough to make sure that your system is properly set up, and to demonstrate some of the features of the Cognachrome Vision System.
First, make sure that ARC is installed correctly (see section Getting Set Up to Use ARC). Also, you'll need to have some sort of monitor hooked up to the Pioneer's Video Out port.
We'll be running the system in Saphira mode (see section Saphira Interaction Mode). If you are running the Saphira host program, exit it before
starting ARC. Run ARC with the -saphira flag, as well as with any
other necessary flags (such as the -port flag, to specify which
serial port to use).
arc -saphira -port portname
You should get an `arc>' prompt in the window where you ran ARC. Also, ARC should bring up a new window with a `saphira>' prompt. It may also bring up another window at this time which will be used for TPUVIS Prompt interaction (see section TPUVIS Prompt Mode).
Turn on the power for the Pioneer robot and the vision system, or press the Boot Button on the vision interface panel (see section Setting Up the Pioneer Vision Hardware). You should get a few lines of messages printed to the `arc>' window.
Now the system should be ready to go. Type v at the `saphira>' prompt. (Then press ENTER or RETURN. You need to do this after every line you type, even though I won't mention it again through the rest of this section.)
saphira> v
pioneer 26.0;vision 26.0
The exact version numbers you get may be different, but you should get something formatted much like the above. If you don't, here are some things to check:
If you have checked these things and it still does not work, see section Pioneer-Specific Serial Troubleshooting.
If the version did print correctly, we're ready to try out some more features.
First, let's try to grab a frame of video.
saphira> G0
frame sent
If printing the version string worked, but the board did not respond with a
frame sent response, then your camera is probably not connected or
not powered on (see section Setting Up the Pioneer Vision Hardware). Check
this now.
After about 10 seconds, a window should pop up showing a low-resolution picture of what the robot is seeing. (You may have to move the mouse into the window to see the correct colors. You can hit `q' in this window to make it go away.)
You can replace the `0' with `1' or `2' for faster, but lower quality, uploads.
saphira> G2
frame sent
Now let's check on the video tracking abilities. First, let's try training the system. (This is only an overview of the training process. See section Color Training, for more detailed instructions.)
Make sure you have a monitor hooked up to the Pioneer's video out port. Place a large object of some bright, uniform color (we like bright orange) in the center of the Pioneer's field of view (you can use `G#' to check this). To train the system on this color, type:
saphira> sa
retrained
When you type this, the monitor should lose sync for a second, and then display the newly trained tracking output. You should see the silhouette of the object you trained on; if there are other objects of that color or a similar color in the Pioneer's field of view, you will be able to see them also.
If the tracking output looks grainy (black dots inside the object), you can improve the training with the `j' command.
saphira> ja
incrementally trained
After you've entered this command, move the object around slightly while the screen is flickering.
Now you can see the color tracking output on the monitor. See section Saphira Mode Channel Commands, for more commands to adjust the color training and view the tracking output of the other tracking channels.
Now let's look at the edge detection capabilities.
saphira> E0
edge-detected frame sent
This will take a few seconds. You should see a window pop up which contains a gray-scale image showing the edges in the Pioneer's field of view.
The vision system has a visual sonars mode, in which the distance to obstacles in different directions is estimated using the edge-detection information. To see a display of this information, use the `D' command:
saphira> D
distmap sent
You should see a graph showing eight horizontal segments of varying height. Each segment represents the vision system's estimate of the distance to the nearest obstacle in the given direction. To see a running display of this plot,
saphira> DB
distmap started
Now you can play with this display, putting various obstacles in front of the Pioneer to see how it reacts. Use `DE' to stop.
saphira> DE
distmap stopped
That's it for this walkthrough. If you've gotten to this point, you should be confident that the vision system is working correctly, and that you understand some of its basic capabilities.